Most schedules are set up from the Saved Reports page. Open the report's row and click the Schedule action — the schedule lives with the report, not on a separate page.
How to start
- From the menu, click Saved Reports.
- Find the report you want to schedule and click Schedule in its Actions column.
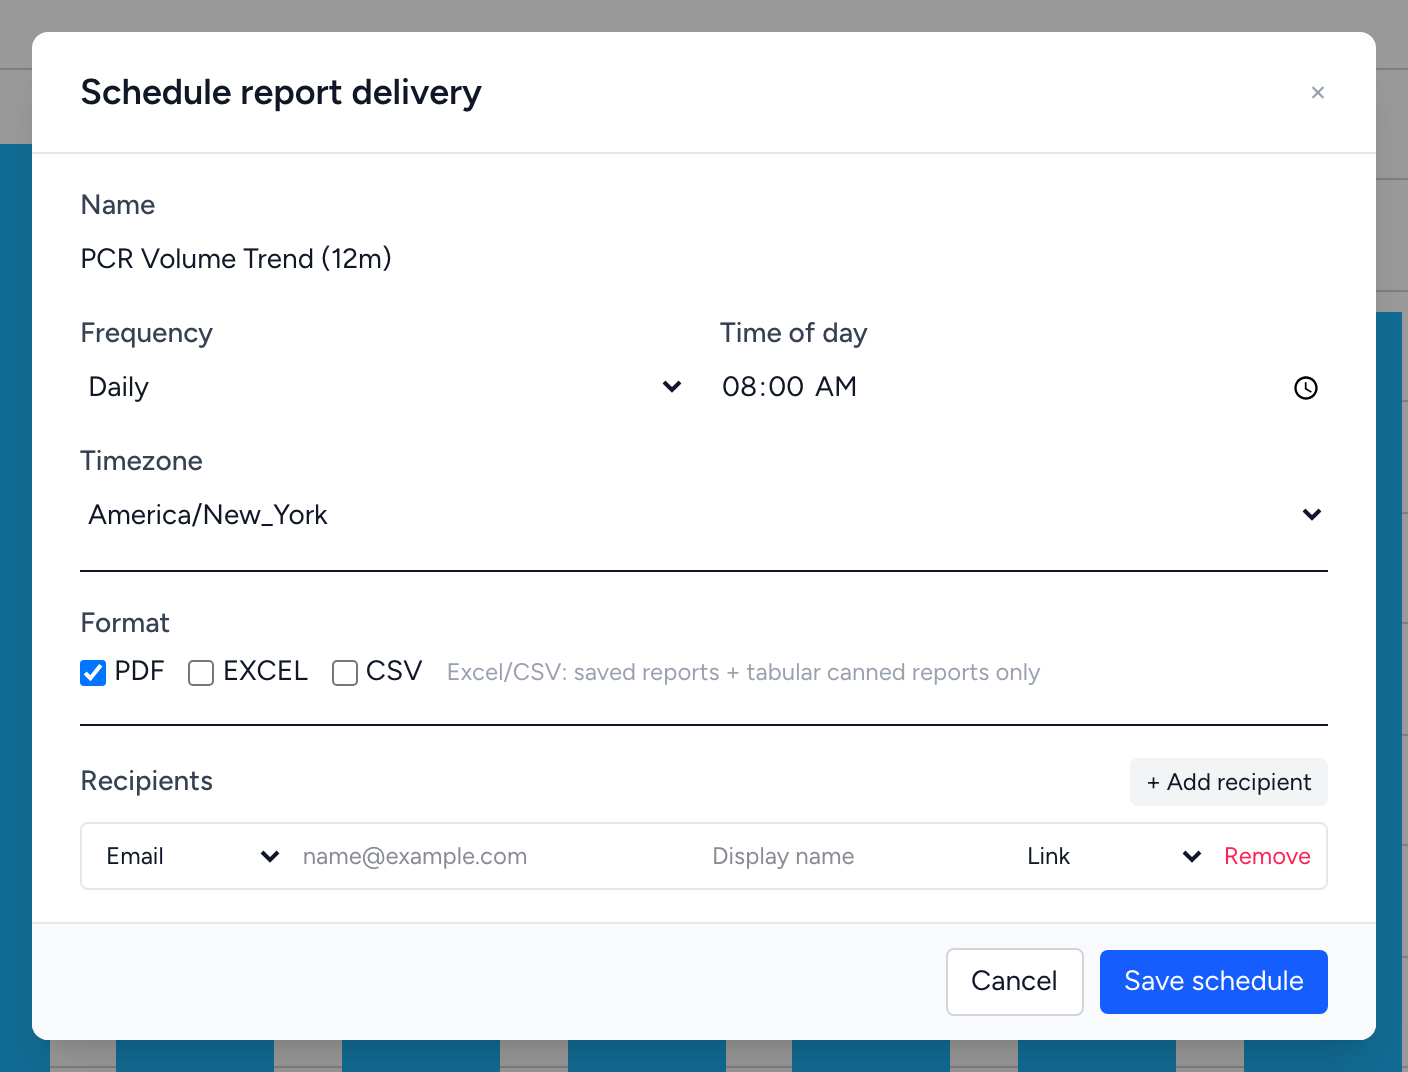
- The Schedule report delivery dialog opens with the report's name pre-filled.
A small number of canned reports also expose a Schedule button on their toolbar — for example, PCR Volume Trend under Operations. The dialog is the same in either place.
The dialog, field by field
Name
What this schedule will be called in the email subject line and in delivery records. Examples: Daily PCR Volume Email, Monday QA Roll-up.
Frequency and time of day
Pick how often the report runs:
- Daily — every day at the time you pick.
- Weekly — once a week. A second dropdown appears so you can pick the day of week.
- Monthly — once a month. A second field appears for the day of month (capped at 28 so it works in February).
- Custom (cron) — for anything more complex. Paste a cron expression like
0 8 * * 1-5for "8 AM every weekday."
Timezone
The timezone the time-of-day runs in. The dropdown picks up your browser's timezone by default, but you can change it. Schedules that span operations in multiple timezones should usually run in the agency's home timezone.
Format
Pick one or more output formats. The recipient gets one file per format, attached to the message and / or available behind the link:
- PDF — a rendered snapshot suitable for human reading.
- Excel — a spreadsheet for charts that have a tabular underlying grid, or for any saved report. Not all canned reports can render to Excel.
- CSV — a plain comma-separated file for the same data Excel would receive.
Excel and CSV are only available for saved reports and tabular canned reports — there is a hint right next to the format checkboxes that says so.
Recipients
Each recipient is one row in the Recipients section. Click + Add recipient to add another row. Each row has:
- Channel — Email or SMS.
- Address — the email address or phone number (in international format, e.g.
+15551234567). - Display name — optional, used for the greeting in the email.
- Mode — how the report reaches them: Link (just a link to a one-time download), Attachment (the file is attached), or Both. SMS recipients always get a link only — the dialog tells you that under the row.
What happens if the report contains PHI
When you open the dialog, the system checks whether the report contains protected health information. If it does, an amber banner appears at the top: "This report contains PHI." The banner also lists which columns are flagged as PHI.
When PHI is present, three rules are enforced automatically:
- Recipients must be Unified Solutions users on this company. External email addresses are rejected on save.
- Email attachments are disabled. Mode is forced to Link for every recipient.
- Recipients must sign in to view the report — the link bounces through SSO and verifies them before serving the file.
If you need to send a PHI report to an outside email, you cannot — that is the wrong channel for it. Add the person as a Unified Solutions user on your company first.
Saving the schedule
Click Save schedule. The dialog closes and the row's Schedule column on the Saved Reports page flips to Scheduled. The Run button on that row becomes active so you can fire off an immediate delivery if you want to verify everything is set up the way you intended.
Examples
Daily PCR Volume to the operations chief. Open PCR Volume Trend, click Schedule, set Daily, 7:00 AM, your timezone, PDF format, one email recipient (the chief), Mode = Both. Save. You now have a daily PDF in the chief's inbox at 7 AM.
Weekly QA roll-up to the QA team. Build a saved report in the Builder with the columns the team uses. From Saved Reports, click Schedule on its row. Frequency = Weekly, Day = Monday, Time = 8:00, Format = PDF + Excel. Add each QA reviewer as a recipient with Mode = Link. Save.