Two kinds of scanning
Drug Tracking uses scanning in two ways, and it helps to know the difference:
- Manufacturer barcode — the barcode printed on drug packaging. Scanning it fills in the product, lot number, and expiry date for you.
- Company QR label — a label your agency prints and sticks on each unit it tracks one at a time. That covers controlled drugs when QR code pairing is turned on, and it can cover any other inventory item too. Scanning the label identifies that exact vial or item.
Scanning a manufacturer barcode
When you add or replace drug stock, look for the scan option. You can use your device camera, a connected scanner, or pair your phone as a scanner. Scan the barcode on the packaging and Drug Tracking reads what is encoded:
- NDC (National Drug Code) — identifies the specific drug product.
- Lot number — the manufacturer's batch identifier.
- Expiry date — when the drug expires.
The matching fields fill in automatically. Check them, then confirm.
QR labels are not just for drugs
Your agency can track any inventory item by unit — defibrillator pads, kits, equipment — with the same printed QR labels used for controlled drugs.
- Drugs follow the agency-wide setting. In Settings, the QR / barcode tracking card has a Require QR pairing for drugs dropdown: Controlled drugs only or All drugs.
- Other items opt in one product at a time. An agency admin edits the product and turns on Track each unit with a QR code. From then on, every unit of that product needs its own label when it is stocked, removed, or replaced.
See Setting up QR code pairing for how to turn this on and print labels.
Scanning during a shift checkout
When an item on your checkout list carries a QR label, the app asks for a scan whenever that item changes hands. On the Shift Checkout page:
- Click Replace (or Add) on the item's row.
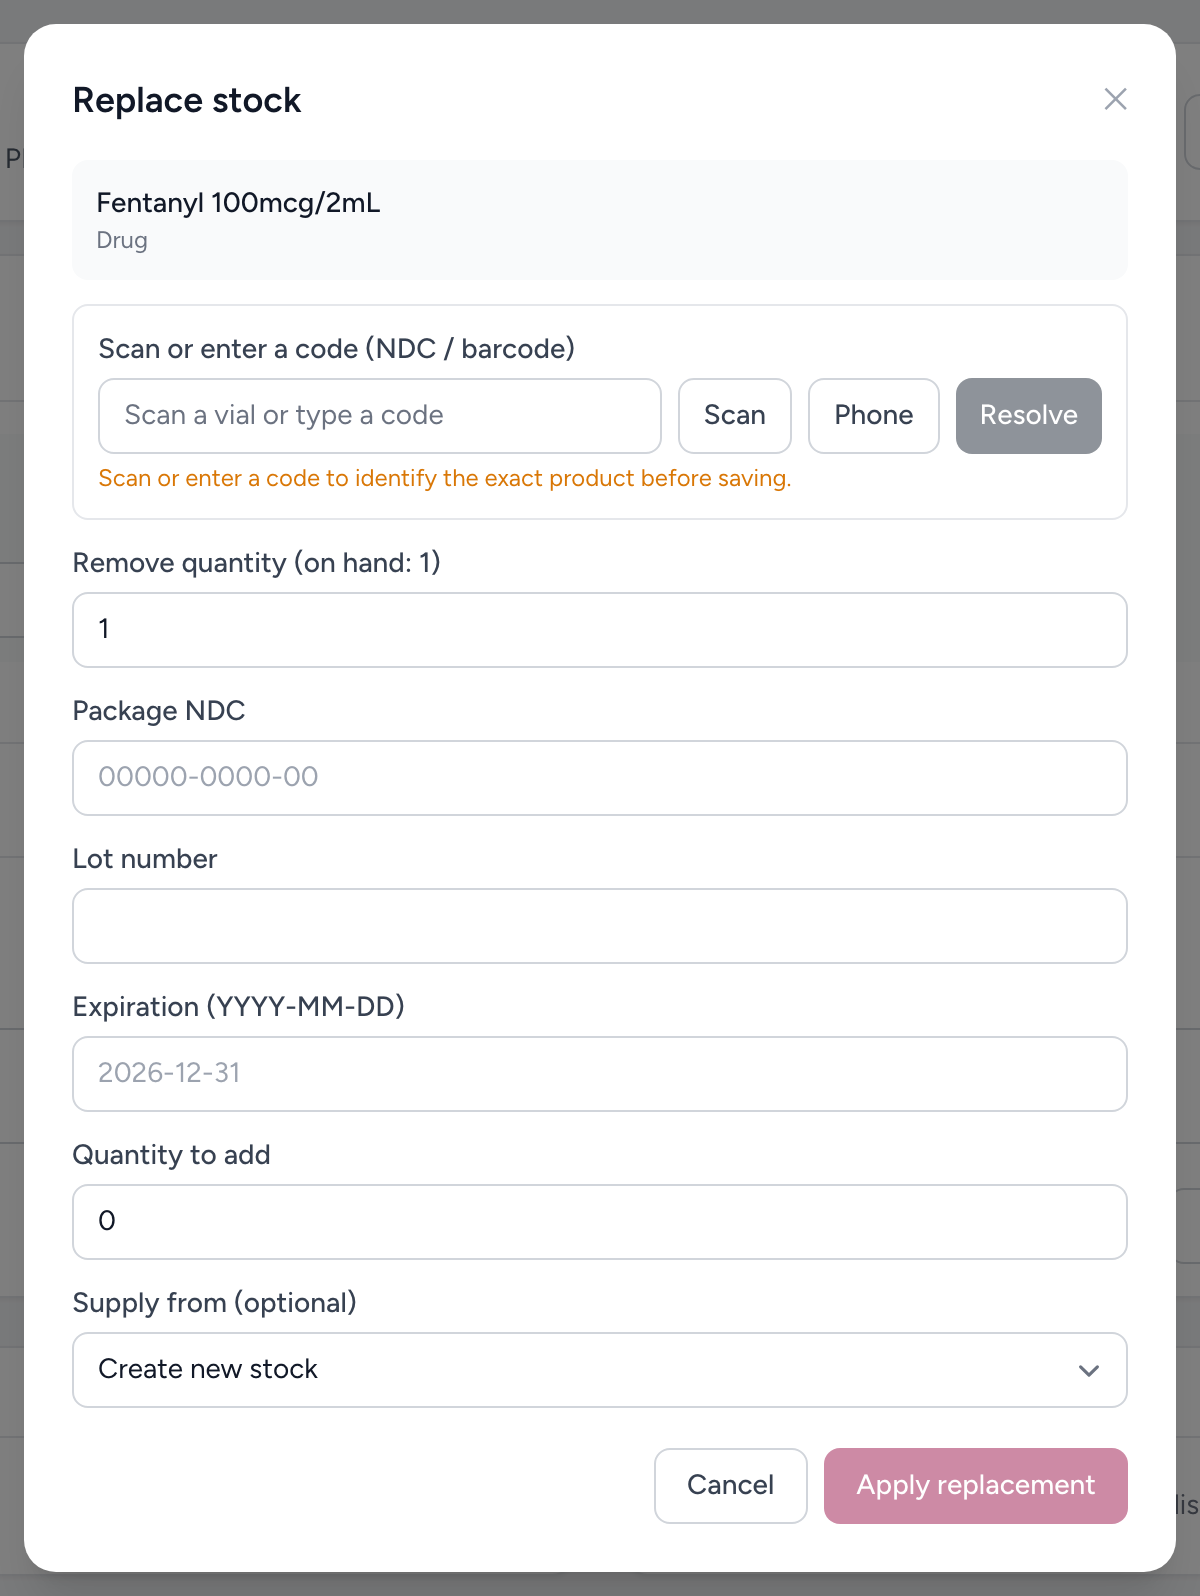
- For a drug, scan the manufacturer barcode on the new packaging in the Scan or enter a code (NDC / barcode) field. The lot number and expiration fill in.
- For a replacement, scan the label on the unit you are pulling into Barcode on removed item. Use the Scan button for your device camera or Phone to scan with your phone.
- Scan the fresh label on the new unit into Barcode for new item.
- Click Apply replacement (or Add stock). The old label is retired and the new one is now tied to that unit.
Scanning both labels is what keeps the record straight: it proves which exact unit left the truck and which one took its place.
Counting a location by scanning
Instead of counting by eye, you can count a whole location by scanning every QR label in it. On the Shift Checkout page, each location with QR-tracked items shows a Scan to count button until it is verified.
- Click Scan to count on the location card.
- Click Scan to use your device camera, or Phone to scan with your phone. The camera stays open between scans, so work through the bag label by label without touching the screen. A handheld scanner works too: scan into the text box and click Add.
- Watch the tally. Each item shows how many units you have scanned against how many are expected, with an OK, Short, or Over badge. Scanning the same label twice does not double-count.
- Check the Needs a look panel if it appears. It lists labels that belong to another location, labels that were already retired, and codes the app does not recognize.
- Click Apply counts to record the result. Items that came up short or over are reported with a note like "Scan count: 4 of 5", and the footer tells you how many items will be updated before you click. You still click Verify location to sign off on the location as usual.
Items without QR labels are listed under "Not tracked by QR" so you know to count them by hand. Drugs tracked by total dose rather than unit count show Check dose by hand, because a label scan cannot measure what is left in a vial.
Tip: the phone is usually the fastest way to count a truck. Pair it once with the Phone button, then walk the compartments scanning as you go. Every scan lands in the tally on your computer.
Scanning while stocking a location
Agency admins see scanning in two more places on a location page:
- Add items — the Scan / paste barcode field accepts a company QR label or a manufacturer barcode. Click Scan to use your camera, Use phone to scan with your phone, or type a code and click Lookup. A match fills in the product, and for drugs the lot number and expiration too. QR-tracked items lock the quantity to 1 so each unit gets its own label.
- Assign QR — appears on a row when units on the shelf still need labels. Scan one label per unit and click Assign. Use this to label stock that was added before QR tracking was turned on.
Tip: receiving a big shipment? Print a label roll bound to one product from the Company QR Labels page, stick the labels on as you shelve, then use the Pre-assigned label roll option in Add items. The labels are assigned in order automatically, so you do not scan each unit.
Using your phone as a scanner
Every scan field has a phone option (Phone or Use phone). It opens a Scan with your phone window with a pairing code. Point your phone camera at that code and your phone becomes the scanner — every barcode it reads lands straight in the field on your computer. This is handy at a supply shelf where the computer camera cannot reach the labels.
Examples
Drug replacement. You are replacing an expired vial of Midazolam on Medic 12. You grab a fresh vial from the station supply. Instead of squinting at the tiny print on the vial to read the lot number, you scan the barcode on the box and the lot number and expiry date fill in. Then you scan the old vial's QR label as the removed item and the fresh vial's label as the new item, and click Apply replacement.
Tracked equipment. Your agency turned on Track each unit with a QR code for defibrillator pads. During your checkout you find a torn package. You click Replace, scan the label on the torn package, scan the label on the new one, and the swap is recorded down to the exact unit.
Tip
For manufacturer barcodes, scan the outer packaging (the box) rather than the vial itself. The box barcode is usually larger, easier to scan, and more likely to include all the encoded data. If you only have the vial, it will usually still work but may take a steadier hand.